近年、SnowやSnapChatなどの自撮りアプリが盛況ですが、実際に自分で開発しようとなるとなかなかハードルが高いのが現状です。特に顔認識や表情認識は無料で提供されている開発環境があまりなく、有料のものは個人が購入できるレベルの価格でないことが多いようです。
openFramework(OF)では比較的古くからofxFaceTrackerというアドオンがありますが、このアドオンは定期的にアップデートされており、2018年7月時点の最新版であるバージョン0.10.0にも対応しています。
ここでは、まずはじめにofxCVというコンピュータビジョンのアドオンを使って、カメラの映像にエフェクトをかけてみます。そして次に、ofxFaceTrackerを使った自撮りアプリを作成する手順を解説します。自撮りアプリは考え方次第ではまだまだいろんなアイデアが出せる領域でもあるので、頭を柔らかくしてアイデアを出してみてください。
ofxCVアドオンのダウンロードとインストール
ofxCVをgithubからダウンロードします。
https://github.com/kylemcdonald/ofxCv
OF stable (0.9.8): use ofxCv/stable
OF master (0.10.0): use ofxCv/master
とあるので、今回はOFは0.10.0を使うので、masterをそのまま使います。
「ofxCv-master.zip」がダウンロードされるので、解凍して「ofxCv」というフォルダ名にしましょう。
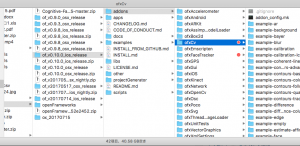
そして、以下のaddonsフォルダに入れます。
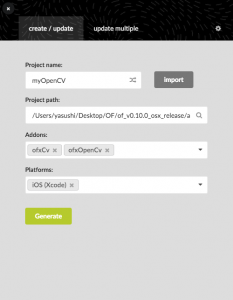
OFのProjectGeneratorで、以下のように記入し、ofxCVアドオンを読み込みます。標準のアドオンであるofxOpenCVも使う(名称が似ている)ので、こちらも読み込んでください。
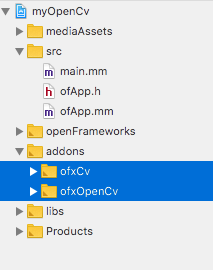
正しく読み込まれると、プロジェクトのサイドバーのaddonsフォルダにofxCVとofxOpenCVが表示されます。
ofxCVのエフェクトを使う
まずは、ofxCVの機能を使ったエフェクトをかけてみましょう。ofApp.hで以下の変数を宣言します。ofxCvを使うため、ofxCv.hとofxOpenCv.hの使用を宣言することを忘れないでください。
ofApp.h
1 2 3 4 5 6 7 8 9 10 11 12 13 14 15 16 | #pragma once #include "ofxiOS.h" #include "ofxCv.h" #include "ofxOpenCv.h" class ofApp : public ofxiOSApp{ public: /*省略*/ ofVideoGrabber cam; //カメラ用変数 //各種エフェクト用変数 ofImage gray, blur, edge, comic, thresh, eroded, dilated; }; |
次に、setup()、update()、draw()でカメラの設定やエフェクトの設定をおこないます。
ofApp.mm
1 2 3 4 5 6 7 8 9 10 11 12 13 14 15 16 17 18 19 20 21 22 23 24 25 26 27 28 29 30 31 32 33 34 35 36 37 38 39 40 41 42 43 44 45 46 47 48 49 50 51 52 53 54 55 56 57 58 59 60 61 62 63 64 65 66 67 68 69 70 71 72 73 74 75 76 77 78 79 80 81 82 83 84 | using namespace ofxCv; //-------------------------------------------------------------- void ofApp::setup(){ //デバイスの向きを縦に固定 ofSetOrientation(OFXIOS_ORIENTATION_PORTRAIT); //インカメラはDeviceID(1) cam.setDeviceID(1); cam.setup(640, 480); //コミック風画像のメモリ領域確保 comic.allocate(cam.getWidth(), cam.getHeight(), OF_IMAGE_GRAYSCALE); } //-------------------------------------------------------------- void ofApp::update(){ cam.update(); //カメラの映像を更新 //カメラ映像が更新されたら if(cam.isFrameNew()) { //openCVの機能を使ってエフェクトをかける //Canny()の引数については以下のリンクを参照のこと //http://labs.eecs.tottori-u.ac.jp/sd/Member/oyamada/OpenCV/html/py_tutorials/py_imgproc/py_canny/py_canny.html ofxCv::convertColor(cam, gray, CV_RGB2GRAY); ofxCv::GaussianBlur(gray, blur, 5); ofxCv::Canny(blur, edge, 20, 100); ofxCv::threshold(cam, thresh, 100.0, false); ofxCv::erode(cam, eroded, 5); ofxCv::dilate(cam, dilated, 5); gray.update(); blur.update(); edge.update(); thresh.update(); eroded.update(); dilated.update(); //comic//////////////////////////// //blurとedgeを組み合わせてcomicにする unsigned char *blurData = blur.getPixels().getData(); unsigned char *edgeData = edge.getPixels().getData(); unsigned char *comicData = comic.getPixels().getData(); for (int i = 0; i < cam.getWidth() * cam.getHeight(); i++) { if (edgeData[i] == 0) comicData[i] = (blurData[i] / 64) * 64 + 63; else comicData[i] = 0; } comic.update(); } } //-------------------------------------------------------------- void ofApp::draw(){ ofBackground(255, 255, 255); ofPushMatrix(); ofSetColor(255); //画面を鏡面にする ofTranslate(ofGetWidth(), 0); ofScale(-1, 1); //キャプチャ映像を画面に合わせて拡大 float scale = ofGetWidth() / cam.getWidth(); ofScale(scale, scale); //ここの〇〇.draw()をそれぞれ実行してみる if(cam.isFrameNew()) { cam.draw(0, 0); //edge.draw(0, 0); //comic.draw(0, 0); //thresh.draw(0, 0); //eroded.draw(0, 0); //dilated.draw(0, 0); } ofPopMatrix(); } |
どうでしょうか。比較的短いコードでエフェクトをかけることができます。例えば、edge.draw()を実行した場合には以下のようなエフェクトになります。
ピクセルごとの色を抜き出して変換するエフェクトを作る
次に、もう少し自分なりのエフェクトを作ってみます。ofApp.hで以下の変数を宣言します。
ofApp.h
1 2 | ofTexture customColor; //カスタム色画像用変数 unsigned char * pix; //カスタム色画像のピクセルを保存するための変数 |
ofApp.mmのsetup()に以下を追加します。
setup() – ofApp.mm
1 2 3 4 | //カスタム色画像のメモリ領域確保 customColor.allocate(cam.getWidth(), cam.getHeight(), GL_RGB); //カスタム色画像のピクセル(RGBの3色なので、幅x高さx3となる) pix = new unsigned char[ (int)( cam.getWidth() * cam.getHeight() * 3.0) ]; |
ofApp.mmのupdate()のcomic.update()の後に以下を追加します。このコードの中には様々な色変換のサンプルが記載されています。基本的にはRGBの値を変換しているだけですが、アイデア次第で無限のエフェクトを考案することができるでしょう。
update() – ofApp.mm
1 2 3 4 5 6 7 8 9 10 11 12 13 14 15 16 17 18 19 20 21 22 23 24 25 26 27 28 29 30 31 32 33 34 35 36 37 38 39 40 41 42 43 44 45 46 47 48 49 50 51 52 53 54 55 56 57 58 59 60 61 62 63 64 65 66 67 68 69 70 71 72 73 74 75 76 77 78 79 80 81 82 83 | //customColor////////////////////////// //カスタム色画像 unsigned char * pixels = cam.getPixels().getData(); //カメラ画像データ int camW = cam.getWidth(); //撮影画像の幅、高さ int camH = cam.getHeight(); //1ピクセルずつ取り出して、r, g, bを抽出 for (int y = 0; y < camH; y ++){ for (int x = 0; x < camW; x ++){ float r = pixels[y*camW*3 + x*3]; //赤を抽出 float g = pixels[y*camW*3 + x*3 + 1]; //緑を抽出 float b = pixels[y*camW*3 + x*3 + 2]; //青を抽出 //明るさ、コントラスト////////////////////// //brightness = 0, contrast = 1.0で通常の映像 /* float brightness = 50; float contrast = 0.5; r = contrast*(r - 128) + 128 + brightness; g = contrast*(g - 128) + 128 + brightness; b = contrast*(b - 128) + 128 + brightness; */ //色の反転////////////////////// /* r = 255 - r; g = 255 - g; b = 255 - b; */ //セピア////////////////////// /* r = (int)((float)r/255*240); g = (int)((float)g/255*200); b = (int)((float)b/255*145); */ //2色////////////////////// /* int brightness = (r + g + b)/3; if(brightness < 127){ r = 32; //赤 g = 225; //緑 b = 0; //青 }else if(brightness >=127){ r = 255; //赤 g = 180; //緑 b = 0; //青 } */ //3色////////////////////// /* int brightness = (r + g + b)/3; if(brightness < 85){ r = 0; //赤 g = 50; //緑 b = 0; //青 }else if(brightness >=85 && brightness < 170){ r = 0; //赤 g = 150; //緑 b = 255; //青 }else if(brightness >= 170){ r = 255; //赤 g = 100; //緑 b = 0; //青 } */ //変換後の値をpixに保存 pix[y*camW*3 + x*3] = ofClamp(r, 0, 255); //赤 pix[y*camW*3 + x*3 + 1] = ofClamp(g, 0, 255); //緑 pix[y*camW*3 + x*3 + 2] = ofClamp(b, 0, 255);; //青 } } //customColorを更新 customColor.loadData(pix, cam.getWidth(), cam.getHeight(), GL_RGB); |
最後にdraw()内でcustomColor.draw()を追加します。
draw() – ofApp.mm
1 2 3 4 5 6 7 8 9 10 | //ここの〇〇.draw()をそれぞれ実行してみる if(cam.isFrameNew()) { //cam.draw(0, 0); //edge.draw(0, 0); //comic.draw(0, 0); //thresh.draw(0, 0); //eroded.draw(0, 0); //dilated.draw(0, 0); customColor.draw(0, 0); } |
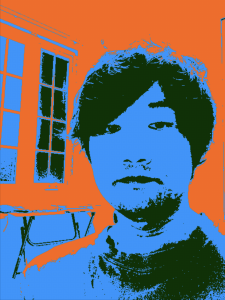
試しに3色にしてみました。
最終的なコードは以下になります。
myOpenCv


