キャプチャ映像の読み込み
キャプチャ映像を表示したりエフェクトをかけたり、さらには人の顔を認識したりなど、プログラミングに置ける画像処理は様々な応用が利きます。また、プログラミングの中で画像処理は比較的難しい部類に入りますが、近年は様々なライブラリが提供されていて、あまり複雑なコードを書かなくても簡単に高度な画像処理技術を使うことができるようになってきました。この授業では、エフェクトや物体認識など、インタラクティブアート作品に必要な技術を中心に基本的なところから解説していきます。
Processingで画像処理を勉強したことがある人は、結構勉強しやすいと思います。
Processingの画像処理(基礎編)
応用編
以下のレジュメは、「of_0071_osx_release」Mac版を利用しておこないます。テスト環境はOSX 10.7.4です。
注意!!!
XCode4.4以上とof_0071_osx_releaseを利用している場合に、コンパイルエラーがでてしまいます。これは、openFrameworksが古いSDK(OS X SDK 10.6)が必要にも関わらずXCode4.4では標準でインストールされないためです。古いSDKをコピーすれば解消します。以下のサイトが参考になります。XCode4.3.3をダウンロードするのがオススメです。
Mountain Lion + Xcode4.4でopenFrameworksをビルドする
ピクセルの色を変える(反転)
このサンプルでは、320 x 340ピクセルで入力した映像の1ピクセルずつを反転させて新たな映像を作っています。
testApp.h
1 2 3 4 5 6 7 8 9 10 11 12 13 14 15 16 17 18 19 20 21 22 23 24 25 26 | #include "ofMain.h" class testApp : public ofBaseApp{ public: void setup(); void update(); void draw(); void keyPressed(int key); void keyReleased(int key); void mouseMoved(int x, int y ); void mouseDragged(int x, int y, int button); void mousePressed(int x, int y, int button); void mouseReleased(int x, int y, int button); void windowResized(int w, int h); void dragEvent(ofDragInfo dragInfo); void gotMessage(ofMessage msg); ofVideoGrabber vidGrabber; unsigned char * videoInverted; ofTexture videoTexture; int w; int h; }; |
testApp.cpp
1 2 3 4 5 6 7 8 9 10 11 12 13 14 15 16 17 18 19 20 21 22 23 24 25 26 27 28 29 30 31 32 33 34 35 36 37 38 39 40 41 42 43 44 45 46 47 48 | #include "testApp.h" //-------------------------------------------------------------- void testApp::setup(){ w = 320; //キャプチャ映像のサイズを決定 h = 240; vidGrabber.initGrabber(w,h); //キャプチャ初期化 videoInverted = new unsigned char[w*h*3]; //反転映像用の変数 videoTexture.allocate(w, h, GL_RGB); //反転映像用のテクスチャを配置 } //-------------------------------------------------------------- void testApp::update(){ ofBackground(0,0,0); vidGrabber.grabFrame(); //キャプチャ実行 if (vidGrabber.isFrameNew()){ //新しいフレームがあったら unsigned char * pixels = vidGrabber.getPixels(); //キャプチャ用の変数 for(int y = 0; y < h; y++){ for(int x = 0; x < w; x++){ //それぞれのピクセルのr, g, bを抽出 //赤 videoInverted[y*3*w + x*3] = 255-pixels[y*3*w + x*3]; //緑 videoInverted[y*3*w + x*3+1] = 255-pixels[y*3*w + x*3+1]; //青 videoInverted[y*3*w + x*3+2] = 255-pixels[y*3*w + x*3+2]; } } //処理後の映像をセット videoTexture.loadData(videoInverted, w, h, GL_RGB); } } //-------------------------------------------------------------- void testApp::draw(){ vidGrabber.draw(0, 0); //普通の映像を描画 videoTexture.draw(w, 0, w, h); //反転映像を描画 } |
ピクセルの色を図形に置き換える
一般的なエフェクトは、例えばぼかしたりキャプチャ映像を図形に置き換えたりしたりして、不思議な効果を出すというケースが非常に多いと思われます。このサンプルでは、そのようなエフェクトを効率よくおこなうための参考例を挙げます。
testApp.h
1 2 3 4 5 6 7 8 9 10 11 12 13 14 15 16 17 18 19 20 21 22 23 24 | #include "ofMain.h" class testApp : public ofBaseApp{ public: void setup(); void update(); void draw(); void keyPressed(int key); void keyReleased(int key); void mouseMoved(int x, int y ); void mouseDragged(int x, int y, int button); void mousePressed(int x, int y, int button); void mouseReleased(int x, int y, int button); void windowResized(int w, int h); void dragEvent(ofDragInfo dragInfo); void gotMessage(ofMessage msg); ofVideoGrabber vidGrabber; int w; int h; }; |
testApp.cpp
1 2 3 4 5 6 7 8 9 10 11 12 13 14 15 16 17 18 19 20 21 22 23 24 25 26 27 28 29 30 31 32 33 34 35 36 37 38 39 40 41 42 | #include "testApp.h" //-------------------------------------------------------------- void testApp::setup(){ w = 320; //キャプチャ映像のサイズを決定 h = 240; vidGrabber.initGrabber(w,h); //キャプチャ初期化 } //-------------------------------------------------------------- void testApp::update(){ ofBackground(0, 0, 0); //画面を黒で初期化 glEnable(GL_BLEND); //透過をON glBlendFunc(GL_SRC_ALPHA, GL_ONE); //ブレンド方法を定義 vidGrabber.grabFrame(); //キャプチャ実行 } //-------------------------------------------------------------- void testApp::draw(){ unsigned char * pixels = vidGrabber.getPixels(); //キャプチャ用の変数 //8pixelごとに飛ばしてキャプチャ映像の色を抽出 //実行速度が遅い場合には、このように、抽出するピクセルを間引くといい。 for(int y = 0; y < h; y+=8){ for(int x = 0; x < w; x+=8){ int r = pixels[y * 3 * w + x * 3]; //それぞれのピクセルのr, g, bを抽出 int g = pixels[y * 3 * w + x * 3 + 1]; int b = pixels[y * 3 * w + x * 3 + 2]; ofSetColor(r, g, b, 127); //透過度50%で描画 ofCircle(20 + x, 20 + y, 10); //円を描く } } } |
OpenCV
OpenCVは、画像処理のためのライブラリです。すでに実習したopenFrameworks標準のビデオ機能でも、様々なエフェクトをかけることはできますが、OpenCVを使うとより物体の追跡等が簡単になります。が、簡易なだけに柔軟性は弱まります。一長一短なので、両方比べて目的にあった方法を使いましょう。
グレースケールの映像
OpenCVにおいては、キャプチャ映像をグレースケールに変換することは非常に簡単です。グレースケール用の変数を用意し、その変数にカラー映像の情報を入れるだけです。
testApp.h
1 2 3 4 5 6 7 8 9 10 11 12 13 14 15 16 17 18 19 20 21 22 23 24 25 26 27 28 | #include "ofMain.h" #include "ofxOpenCv.h" class testApp : public ofBaseApp{ public: void setup(); void update(); void draw(); void keyPressed(int key); void keyReleased(int key); void mouseMoved(int x, int y ); void mouseDragged(int x, int y, int button); void mousePressed(int x, int y, int button); void mouseReleased(int x, int y, int button); void windowResized(int w, int h); void dragEvent(ofDragInfo dragInfo); void gotMessage(ofMessage msg); ofVideoGrabber vidGrabber; ofxCvColorImage colorImg; //カラー画像用変数 ofxCvGrayscaleImage grayImage; //グレースケール画像用変数 int w; //映像の幅 int h; //映像の高さ }; }; |
testApp.cpp
1 2 3 4 5 6 7 8 9 10 11 12 13 14 15 16 17 18 19 20 21 22 23 24 25 26 27 28 29 30 31 32 33 34 35 36 37 | #include "testApp.h" //-------------------------------------------------------------- void testApp::setup(){ w = 320; h = 240; vidGrabber.setVerbose(true); vidGrabber.initGrabber(w,h); colorImg.allocate(w,h); grayImage.allocate(w,h); } //-------------------------------------------------------------- void testApp::update(){ ofBackground(0,0,0); bool bNewFrame = false; vidGrabber.grabFrame(); bNewFrame = vidGrabber.isFrameNew(); if (bNewFrame){ colorImg.setFromPixels(vidGrabber.getPixels(), w,h); grayImage = colorImg; //カラー映像をグレースケールに変換 } //-------------------------------------------------------------- void testApp::draw(){ colorImg.draw(20,20); //カラー映像の描画 grayImage.draw(20+w,20); //グレースケール映像の描画 } |
フレーム差分、物体認識
フレーム差分とは、カメラに動くものが映った場合に動いた部分を抽出するプログラムです。そしてその差分を計算して動いた部分が物体だとプログラムが認識することになります。
最初から全て自力で書くと非常に複雑なプログラムですが、OpenCVでは簡単な関数として提供されています。
前述のコードに追加していきましょう。
testApp.h
1 2 3 4 5 6 7 8 9 10 11 12 13 14 15 16 17 18 19 20 21 22 23 24 25 26 27 28 29 30 31 32 33 | #include "ofMain.h" #include "ofxOpenCv.h" class testApp : public ofBaseApp{ public: void setup(); void update(); void draw(); void keyPressed(int key); void keyReleased(int key); void mouseMoved(int x, int y ); void mouseDragged(int x, int y, int button); void mousePressed(int x, int y, int button); void mouseReleased(int x, int y, int button); void windowResized(int w, int h); void dragEvent(ofDragInfo dragInfo); void gotMessage(ofMessage msg); ofVideoGrabber vidGrabber; ofxCvColorImage colorImg; //カラー画像用変数 ofxCvGrayscaleImage grayImage; //グレースケール画像用変数 ofxCvGrayscaleImage grayBg; //背景画像用変数 ofxCvGrayscaleImage grayDiff; //背景画像との差分用変数 ofxCvContourFinder contourFinder; //物体を認識した時用の変数 int threshold; //しきい値 bool bLearnBakground; //背景画像撮影用変数 int w; //映像の幅 int h; //映像の高さ }; |
testApp.cpp
1 2 3 4 5 6 7 8 9 10 11 12 13 14 15 16 17 18 19 20 21 22 23 24 25 26 27 28 29 30 31 32 33 34 35 36 37 38 39 40 41 42 43 44 45 46 47 48 49 50 51 52 53 54 55 56 57 58 59 60 61 62 63 64 65 66 67 68 69 70 71 72 73 74 75 76 77 78 79 80 81 82 83 84 85 86 87 88 89 90 91 92 93 94 95 96 | #include "testApp.h" //-------------------------------------------------------------- void testApp::setup(){ w = 320; h = 240; vidGrabber.setVerbose(true); vidGrabber.initGrabber(w,h); colorImg.allocate(w,h); grayImage.allocate(w,h); grayBg.allocate(w,h); grayDiff.allocate(w,h); bLearnBakground = true; threshold = 80; } //-------------------------------------------------------------- void testApp::update(){ ofBackground(0,0,0); bool bNewFrame = false; vidGrabber.grabFrame(); bNewFrame = vidGrabber.isFrameNew(); if (bNewFrame){ colorImg.setFromPixels(vidGrabber.getPixels(), w,h); grayImage = colorImg; //カラー映像をグレースケールに変換 //もし、まだ背景画像が撮影されていなかったら、背景画像を撮影 if (bLearnBakground == true){ grayBg = grayImage; bLearnBakground = false; //撮影したらfalseにして、キーを押さない限りは背景画像は撮影されないようにする } //背景画像とキャプチャ映像の差分を計算し、その差分がしきい値を超えているかを分析 grayDiff.absDiff(grayBg, grayImage); grayDiff.threshold(threshold); //囲まれている領域があるかを調べる。この場合、20pixelから横*縦/3の間までピクセルの面を探す。穴を探す場合には最後のパラメータをtrueにする contourFinder.findContours(grayDiff, 20, (w*h)/3, 10, true); // find holes } } //-------------------------------------------------------------- void testApp::draw(){ colorImg.draw(20,20); //カラー映像の描画 grayImage.draw(20+w,20); //グレースケール映像の描画 grayBg.draw(20,20+h); //背景画像 grayDiff.draw(20+w,20+h); //背景画像との差分 //四角形を描く ofFill(); ofSetColor(50, 50, 50); ofRect(20+w,20+h*2,w,h); ofSetHexColor(0xffffff); // 穴を描画 contourFinder.draw(20+w,20+h*2); //もしくは、1つ1つの面を描画 for (int i = 0; i < contourFinder.nBlobs; i++){ contourFinder.blobs[i].draw(20+w,20+h*2); } //最後に情報を掲載 ofSetHexColor(0xffffff); char reportStr[1024]; sprintf(reportStr, "bg subtraction and blob detection\npress ' ' to capture bg\nthreshold %i (press: +/-)\nnum //blobs found %i, fps: %f", threshold, contourFinder.nBlobs, ofGetFrameRate()); ofDrawBitmapString(reportStr, 20, 600); } //-------------------------------------------------------------- void testApp::keyPressed(int key){ switch (key){ case ' ': bLearnBakground = true; //スペースキーを押すと背景画像の撮影を準備する break; case '+': threshold ++; //しきい値を上げる if (threshold > 255) threshold = 255; break; case '-': threshold --; //しきい値を下げる if (threshold < 0) threshold = 0; break; } } |
顔検出
顔検出も比較的簡単にできます。以下のサンプルを参考にしてください。
testApp.h
1 2 3 4 5 6 7 8 9 10 11 12 13 14 15 16 17 18 19 20 21 22 23 24 25 | #include "ofMain.h" #include "ofxCvHaarFinder.h" class testApp : public ofBaseApp{ public: void setup(); void update(); void draw(); void keyPressed(int key); void keyReleased(int key); void mouseMoved(int x, int y ); void mouseDragged(int x, int y, int button); void mousePressed(int x, int y, int button); void mouseReleased(int x, int y, int button); void windowResized(int w, int h); void dragEvent(ofDragInfo dragInfo); void gotMessage(ofMessage msg); ofVideoGrabber vidGrabber; //キャプチャ用変数 ofImage img; //画像一次保存用変数 ofxCvHaarFinder finder; //顔検出用変数 int w; //映像の幅 int h; //映像の高さ }; |
testApp.cpp
1 2 3 4 5 6 7 8 9 10 11 12 13 14 15 16 17 18 19 20 21 22 23 24 25 26 27 28 29 30 31 32 33 34 35 36 37 38 39 40 41 42 43 44 45 46 47 48 | #include "testApp.h" //-------------------------------------------------------------- void testApp::setup(){ w = 320; h = 240; vidGrabber.setVerbose(true); vidGrabber.initGrabber(w,h); img.allocate(w, h, OF_IMAGE_COLOR); finder.setup("haarcascade_frontalface_default.xml"); //顔検出初期化 } //-------------------------------------------------------------- void testApp::update(){ ofBackground(0,0,0); vidGrabber.grabFrame(); unsigned char *cdata = vidGrabber.getPixels(); unsigned char *idata = img.getPixels(); for (int k = 0; k < w*h*3; k++) idata[k] = cdata[k]; img.update(); finder.findHaarObjects(img, 40, 40); //顔検出 } //-------------------------------------------------------------- void testApp::draw(){ // 映像描画 ofSetColor(255, 255, 255); img.draw(0, 0); //四角形を描く ofSetColor(255, 0, 0); ofSetLineWidth(1); ofNoFill(); for(int i = 0; i < finder.blobs.size(); i++) { ofRectangle cur = finder.blobs[i].boundingRect; ofRect(cur.x, cur.y, cur.width, cur.height); } } |
Kinectの利用
何年か前に比べると、openFrameworksにおいてKinectはかなり使いやすくなりました(それでもいくつか不可解な点はありますが)。Kinectの接続にはofxOpenNIを使います。以下の手順に従ってインストールしてください。
1. ofxOpenNIをダウンロード。
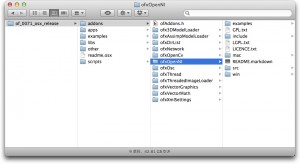
2. フォルダ名を「ofxOpenNI」とし、of_0071_osx_release > addonフォルダに入れる。
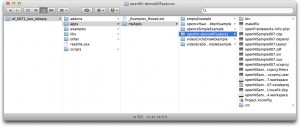
3. of_0071_osx_release > addons > ofxOpenNI > examples > openNI-demoAllFeaturesフォルダを、openNI-of_0071_osx_release > apps > myApps(自身で作成したフォルダ)に入れる。
4. of_0071_osx_release > addons > ofxOpenNI > mac > copy_to_data_openni_path > libフォルダを、of_0071_osx_release > apps > myApps(自身で作成したフォルダ)> openNI-demoAllFeatures > bin > data > openniフォルダにコピー。
5. Kinectを接続して、openNI-demoAllFeaturesのプロジェクトファイルをXCodeで開き、Build SettingをCurrent OSにしてから、OpenNISample007を実行する。
6. プログラムが起動します。「t」キーで骨格の認識、「h」キーで手の認識などの機能があるので、様々な用途に使えそうです。
注意:
コンパイルはできるのに、ログの最後に「image not found」と出てしまい、プログラムが起動しない場合があります。そのときは、
1. MacPortsをインストール。
2. すでにコピーしたlibフォルダのlibusb-1.0.0.dylibというライブラリを、MacintoshHD > opt > local > libフォルダにコピー。
このことによって、libusb-1.0.0.dylibライブラリがプログラムに認識されます。


